

React Interview Questions and Answers (2022)

Table of Contents

react

React is a  free and open-source front-end declarative, efficient and flexible JavaScript library for building user interfaces.

  • It uses VirtualDOM instead of RealDOM considering that RealDOM manipulations are expensive.
  • Supports server-side rendering.
  • Follows Unidirectional data flow or data binding.
  • Uses reusable/composable UI components to develop the view.

As September 2022 we are using react 18.2.0. Check the Latest Version of react here. 

 ReactVanillaJS
FoundedFounded by Jordan WalkeFounded by Brendan Eich
Release year20132012
UsageApplications for mobile, web, and other platformsFaster adoption of frameworks and libraries
DOMVirtualReal
App SizeRelatively SmallRelatively Small
PerformanceHighHigh
Dynamic UI BindingDirect linking of states to the UIDirect updating of UI elements
Data BindingOne-wayTwo-way
Learning CurveSteepModerate
OpinionatingReact is a library that defines the way apps are written. It does this by setting very clear rules about how data can flow through the app, and how the UI will adapt as a result of that changing data. There are other libraries that set similar boundaries, such as Angular and Vue.Vanilla JavaScript code (that is, JavaScript written without libraries) on the other hand, can be thought of as a scripting language that doesn’t set any rules about how data can be defined, or how the UI can be changed. That makes apps written without these libraries more freeform and customizable.
UI RenderingFast compare to vanilla as it uses Virtual DOMSlow as compare to React
PriceOpen SourceOpen Source
What should I choose ?Speed Flexibility Performance It helps to build rich user interfacesFull code understanding Fully customizable In many cases, easier to understand Better performance
ReactReact Native
Release20132015
Usage ReactJS is an open-source JavaScript library used to build the user interface for Web Applications. It follows the concept of reusable components.React Native is an open-source JavaScript framework used for developing a mobile application for iOS Android, and Windows. 
UI Rendering The Virtual DOM renders the browser code. Uses platform-specific APIs to render code for mobile applications.
FunctioningIt provides developers to compose complex UIs from a small and isolated piece of code called “components.” ReactJS made of two parts first is components, that are the pieces that contain HTML code and what you want to see in the user interface, and the second one is HTML document where all your components will be rendered. React Native is same as React, but it uses native components instead of using web components as building blocks. It targets mobile platforms rather than the browser. With React Native it is possible to mimic the behavior of the native app in JavaScript and in the end, you will get platform-specific code as the output. You may even mix the native code with JavaScript if you need to optimize your application further.
 Styling  CSS Requires a style sheet for styling.
JSJSX
JavascriptJavaScript XML
Standard Javascript extension. Is not a standard Javascript extension. it is a syntax extension to JavaScript
Create, configure, and append your HTML tags through JavaScript objects. Also JS  separates the content (markup) from the interactivity (logic), create the elements using an XML-like syntax that will generate the DOM elements for you
Harder to visualize what our DOM will look like. Easier to visualize what our DOM will look like. JSX must have a closing tag, even if it’s a self-closing.

Props are basically properties that you pass as PARAM’s (parameters) from one React component to another component.

Props extend the react functionality of Reusable components.

We can create a static component structure and then pass it props to generate dynamic data.   

You can pass data in React by defining custom HTML attributes to which you assign your data with JSX syntax.

Always make sure to use it in curly braces { data }.

Example :

import { Component } from ‘react’;
 
class App extends Component {
     render() { 
     const hello = ‘Welcome to React’;
        return (
         <div>
           <Hello hello={hello} />
         </div>
        );
     }
 }
class Hello extends Component {
    render() {
         return <h1>{this.props.hello}</h1>;
      }
}
export default App;

Render Props is a simple technique for sharing code between components using a prop whose value is a function. The below component uses render prop which returns a React element.

<DataProvider render={data => (
  <h1>{`Hello ${data.target}`}</h1>
)}/>

Libraries such as React Router and DownShift are using this pattern.

Render Props help us avoid duplicate code and create a more robust app.

In simple words, render props are simply props of a component where you can pass functions.

  1. Components let you split the UI into independent, reusable pieces, and think about each piece in isolation.
  2. Conceptually, components are like JavaScript functions. They accept arbitrary inputs (called “props”) and return React elements describing what should appear on the screen.
  3. Components are independent and reusable bits of code. They serve the same purpose as JavaScript functions, but work in isolation and return HTML. Components come in two types, Class components and Function components.
 
 InternalizationLocalization
DefinitionInternationalization is the process of translating your application into different languages. Localization is a more advanced form of translation/internalization that takes into consideration various factors such as native words and phrases, cultural differences, and other similarities found in a different language or culture. This type of translation is much more detailed as it uses native translators to make it easy for the user to understand.
Libraryi18next, react-i18next, React-intl, React-intl-universal, LinguiJSReact-localization, react-i18next

Cross-site scripting (XSS) is a type of security vulnerability that can occur in web applications. XSS allows an attacker to inject malicious code into a web page, which can then be executed by unsuspecting users who visit the page.

Following are some recommendations to Protect your App from :

  1. Validate all data that flows into your application from the server or a third-party API. This cushions your application against an XSS attack, and at times, you may be able to prevent it, as well.

  2. Don’t mutate DOM directly. If you need to render different content, use innerText instead of innerHTML. Be extremely cautious when using escape hatches like findDOMNodecreateRef in React.

  3. Always try to render data through JSX and let React handle the security concerns for you.

  4. Use dangerouslySetInnerHTML in only specific use cases. When using it, make sure you’re sanitizing all your data before rendering it on the DOM.

  5. Avoid writing your own sanitization techniques. It’s a separate subject on its own that requires some expertise.

  6. In order to protect your application from a DOM-based XSS attack, you must sanitize data that contains HTML elements before rendering it on the DOM. There are a number of libraries out there that you can use. One such library is DOMPurify. Use good libraries for sanitizing your data. There are a number of them, but you must compare the pros and cons of each specific to your use case before going forward with one.

The dangerouslySetInnerHTML attribute is React’s replacement for using innerHTML in the browser DOM. Just like innerHTML, it is risky to use this attribute considering cross-site scripting (XSS) attacks. You just need to pass a __html object as key and HTML text as value.

Definition : DOM stands for “Document Object Model,” which represents your application UI and whenever the changes are made in the application, this DOM gets updated and the user is able to visualize the changes. DOM is an interface that allows scripts to update the content, style, and structure of the document.

Issues with DOM : DOM was originally intended for static UIs — pages rendered by the server that don’t require dynamic updates. When the DOM updates, it has to update the node as well as re-paint the page with its corresponding CSS and layout.

React’s Solution to OG DOM : React uses a Virtual DOM to render components.

Virtual DOM is a node tree similar to Real DOM that lists elements, content, and attributes as objects and properties.

The Virtual DOM is a light-weight abstraction of the DOM. You can think of it as a copy of the DOM, that can be updated without affecting the actual DOM. It has all the same properties as the real DOM object, but doesn’t have the ability to write to the screen like the real DOM. The virtual DOM gains it’s speed and efficiency from the fact that it’s lightweight. In fact, a new virtual DOM is created after every re-render.

Reconciliation in Virtual DOM : Reconciliation is the process to compare and keep in sync the two files (Real and Virtual DOM). Diffing algorithm is a technique of reconciliation which is used by React.

The react-dom package provides DOM-specific methods that can be used at the top level of your app and as an escape hatch to get outside the React model if you need to.

The react-dom package also provides modules specific to client and server apps:

The react-dom package exports these methods:

These react-dom methods are also exported, but are considered legacy:

Note: Both render and hydrate have been replaced with new client methods in React 18. These methods will warn that your app will behave as if it’s running React 17 (learn more here).

What is a Hook? :

Hooks are functions that let you “hook into” React state and lifecycle features from function components. Hooks don’t work inside classes — they let you use React without classes. 

Hooks were added to React 16.8+.

Rules of Hooks:

Hooks are JavaScript functions, but they impose two additional rules:

  • Only call Hooks at the top level. Don’t call Hooks inside loops, conditions, or nested functions.
  • Only call Hooks from React function components. Don’t call Hooks from regular JavaScript functions. (There is just one other valid place to call Hooks — your own custom Hooks.)


  1. useState is a Hook (function) that allows you to have state variables in functional components. You pass the initial state to this function and it returns a variable with the current state value (not necessarily the initial state) and another function to update this value.
  2. If you use the previous value to update state, you must pass a function that receives the previous value and returns an updated value.
  3. If you use the same value as the current state (React uses the Object.is for comparing) to update the state, React won’t trigger a re-render.
  4. More on Equality comparisons and sameness in js:

    JavaScript provides three different value-comparison operations:

    • === — strict equality (triple equals)
    • == — loose equality (double equals)
    • Object.is()

    Which operation you choose depends on what sort of comparison you are looking to perform. Briefly:

    • Double equals (==) will perform a type conversion when comparing two things, and will handle NaN-0, and +0 specially to conform to IEEE 754 (so NaN != NaN, and -0 == +0);
    • Triple equals (===) will do the same comparison as double equals (including the special handling for NaN-0, and +0) but without type conversion; if the types differ, false is returned.
    • Object.is() does no type conversion and no special handling for NaN-0, and +0 (giving it the same behavior as === except on those special numeric values).

    They correspond to three of four equality algorithms in JavaScript:

    Note that the distinction between these all have to do with their handling of primitives; none of them compares whether the parameters are conceptually similar in structure. For any non-primitive objects x and y which have the same structure but are distinct objects themselves, all of the above forms will evaluate to false.
  5. So useState() returns a pair.
  6. Firstly it will return the current state and second is an updater function, you can easily assign these values by using array de-structuring.
  7. It receives the initial state value as an argument, it doesn’t necessarily have to be an object, it could be a number or string, depending on what is needed.
  8. To update multiple values, it’s ok to call useState multiple times.
  9. Updating a state variable with useState always replaces the previous state, this is a key difference when compared to setState that merges states.
  10. It returns the same state value passed as an argument when the initial render happens.
  11. If it’s called after the initial render, the first value returned will be the most recent after the executed updates.
  12. Usage :
    To define state:
    const [state, setState] = useState(initialState);

    Then set the state later in code by:
    setState(newState);
  13. What will happen if you use setState() in constructor?

    When you use setState(), then apart from assigning to the object state React also re-renders the component and all its children. You would get error like this: Can only update a mounted or mounting component. So we need to use this.state to initialize variables inside constructor.

  1. React useEffect is a function that gets executed for 3 different React component lifecycles.
  2. Those lifecycles are componentDidMount, componentDidUpdate, and componentWillUnmount lifecycles.
  3. The idea to use useEffect hook is to execute code that needs happens during lifecycle of the component instead of on specific user interactions or DOM events.

    For instance, you wish to set a timer that executes a code when the component is rendered initially or as done in your initial example, the document title is updated when the component mounts, there is no user interaction associated here

    useEffect is an alternative for lifecycle method in class components in a functional component. It can be used to execute actions when the component mounts, or certain prop or state updated for component as well as to execute code when the component is about to unmount.

  4. To understand the useEffect React Hook, we first need to understand about the Side Effects.

    What are Side Effects ?

    From our knowledge of React, we know that our React App has one main role : render the UI and react to user input to re-render the UI when it is needed.
    So React evaluates and renders JSX, manages state and props, re-evaluates the component upon changes in state and props. This is all possible because of the reactivity system of React and the features that React ships with.

    1. We can handle these side effects using the useEffect Hook.
    2. Side Effects

      Side Effects are anything else that might be happening in your application. It could be some HTTP request that you make, storing something in the localStorage, setting and managing timers.
      Now the main thing to emphasize here is that these tasks (which we termed as side effects) must happen outside of the normal component evaluation and render cycle and the reason for that is that these side effects might block or delay the rendering process.Examples of side-effects are fetch-requests, manipulating DOM directly, and using timer functions like setTimeout,setInterval, etc. We can handle these side effects using the useEffect Hook.

    3. To import and use useEffect :
      1. import {useEffect} from 'react'
      2. useEffect (() => {
        //any side effect
        return () =>{
        //cleanup if required
        }
        },[dependencies]
    4. The first argument to useEffect is a function that should be executed AFTER every component evaluation if there is a change in the specified list of dependencies

      The second argument is the list of dependencies which are the specific dependencies of this effect – the function only runs if there is a change in these dependencies. So whenever such a dependency changes, the function that gets passed as the first argument to useEffect Hook will re-run. Therefore in that first function you can put any side effect code and that code will then only execute when there is a change in the specified dependencies and not when the component re-renders.

      You should add everything that you use in the effect function as a dependency i.e all the state variables and the functions you use in there.

      That is of course correct, but there are a few exceptions that you should be aware of :

      1. DON’T add state updating functions to the list of dependencies because ultimately these are functions that will never change.
      2. DON’T add built-in APIs or functions like fetch, localStorage, browser APIs because they by any means are not related to the React Component Render Cycle and they also never change. So it does not make sense to put them into the list of dependencies if they are not bound to change.
      3. DON’T add variables or functions that you might have defined outside of your components because even if they change they are not going to cause a re-evaluation of your components.

      Sometimes we may need an effect for performing cleanup tasks. So what we do in this case is that we return a cleanup function which React ultimately executes to perform the cleanup task (see the structure of useEffect shown above).

      Now before the execution of the useEffect function, except for the very first time when it runs, this cleanup will run. In addition, the cleanup function will also get executed when the component you’re specifying the effect in unmounts from the DOM.
      So the cleanup function would run before every new side effect function execution and before the component is removed.

  1. The useContext accepts the value provided by React.createContext and then re-render the component whenever its value changes but you can still optimize its performance by using memoization.
  2. It basically lets you subscribe to React’s context without any nesting required.
  3. It receives a context object which is just the object returned from React.createContext().
  4. Triggers a rerender when the provider updates.
  1. Context provides a way to pass data through the component tree without having to pass props down manually at every level.

    In a typical React application, data is passed top-down (parent to child) via props, but such usage can be cumbersome for certain types of props (e.g. locale preference, UI theme) that are required by many components within an application. Context provides a way to share values like these between components without having to explicitly pass a prop through every level of the tree.

  1. A React component that subscribes to context changes. Using this component lets you subscribe to a context within a function component.
  2. Requires a function as a child. The function receives the current context value and returns a React node. The value argument passed to the function will be equal to the value prop of the closest Provider for this context above in the tree.
  3. All consumers that are descendants of a Provider will re-render whenever the Provider’s value prop changes. The propagation from Provider to its descendant consumers (including .contextType and useContext) is not subject to the shouldComponentUpdate method, so the consumer is updated even when an ancestor component skips an update.
  4. You can think of “consumer” as the component whose state “consumes” the useContext hook. AKA you’ll only see a re-render from the components where the hook is used. This way not ALL children inside a Context Provider will be re-rendered on a state change, only those who consume it.
  1. There are some times when re-rendering of the component results in performance issues. To overcome this, React provides us with a performance feature known as memoization.

    Memoization is an optimization technique that allows an increase in the performance of a program by storing the results of some expensive function so that we don’t need to call that function when the same inputs are given.

  2. HOW TO IMPLEMENT MEMOIZATION IN REACT:

    React has the features PureComponent and memo hook which allow us to implement memoization in React.
    PureComponent allows us to perform optimization. It depends on the shouldComponentUpdate() lifecycle method but it can only be used with the class component.
    React also gives us a memo() hook to apply memoization for functional components.
    If we need a function component that gives the same result for the same props and we don’t want to re-render it, we can use memoization to skip the re-render of the component by storing and reusing the last rendered result.

  3.  

    MEMOIZATION USING PURECOMPONENT:

    PureComponent is similar to Components in React except that PureComponent implements shouldComponentUpdate() with shallow prop and state comparison and Components does not.
    In some cases, if our component re-renders the same result with the same given props and state which results in performance issues, then we can use PureComponent to increase performance. PureComponent’s shouldComponentUpdate() only shallowly compares the object.
    But we should make sure that props and state are simple. If they contain any complex data structures then PureComponent may produce wrong results. Also, we should make sure that all the children components of PureComponent are also PureComponent since PureComponent’s shouldComponentUpdate() skips prop updates for the full component subtree.

    EXAMPLE

    
    import React, {
      Component,
      PureComponent
    } from 'react';
    import './App.css';
    import User from './User';
    class App extends PureComponent {
      constructor() {
        super();
        this.state = {
          count: 10
        }
      }
      render() {
        console.warn('render');
        return (
          <div className="App">
              <p>Count {this.state.count}</p>
              <button onClick={()=>{this.setState({count:20})}}>Update</button>
          </div>
        );
      }
    }
    export default App;


  4. MEMOIZATION USING MEMO

    In React, the memo is the higher-order component in short HOC (HOC are functions that take a component and return a new component). Memo allows us to implement memoization in functional components since PureComponents can only be used in class components.

    
    const MyComponent = React.memo(function MyComponent(props) {
      /* render using props */
    });
    

    We can make a custom comparison function and pass it as a second argument to memo to control its default comparison behavior, which shallowly compares complex objects in the props object.

    function MyComponent(props) {
      /* render using props */
    }
    
    function areEqual(prevProps, nextProps) {
      /*
      if results are same when passing prevProps and when 
      passing nextProps then areEqual will return true, if 
      results are not same then it will return false 
      */
    }
    export default React.memo(MyComponent, areEqual);
    

    We can say that areEqual is the inverse of shouldComponentUpdate() since it returns true if props are equal and false if props are not equal.

    EXAMPLE

    const List = React.memo(({
      items
    }) => {
      log('renderList');
      return items.map((item, key) => (
        <div key={key}>item: {item.text}</div>
      ));
    });
    export default function App() {
      log('renderApp');
      const [count, setCount] = useState(0);
      const [items, setItems] = useState(getInitialItems(10));
      return (
        <div>
          <h1>{count}</h1>
          <button onClick={() => setCount(count + 1)}>
            inc
          </button>
          <List items={items} />
        </div>
      );
    }


  5. MEMOIZATION USING useMemo()

    If you are a Hook fan then you can use useMemo for implementing memoization. To utilize useMemo we need to pass a create function and an array of dependencies. useMemo optimizes performance by recomputing the memoized value only when one of the passed dependencies changes.

    /* use of useMemo hook for memoization */
    const valueMemoized = useMemo(() => computeExpensiveValue(a, b), [a, b]);
    

    We should only implement useMemo for performance optimization and for that we should first write our code such that it works without useMemo and then add useMemo to optimize it. Also, we should know that useMemo runs during rendering so we need to make sure that we do not use anything that is not used during rendering, like side effects.

    EXAMPLE

    
    import {  useState,  useMemo} from 'react';
    export function CalculateFactorial() {
      const [number, setNumber] = useState(1);
      const [inc, setInc] = useState(0);
      const factorial = useMemo(() => factorialOf(number), [number]);
      const onChange = event => {
        setNumber(Number(event.target.value));
      };
      const onClick = () => setInc(i => i + 1);
      return (
        <div>
    <input type="number" value={number} onChange={onChange} />
    = {factorial}
    <button onClick={onClick}>Render again</button>
      </div>
      );
    }
    
    function factorialOf(n) {
      console.log('factorialOf(n) called!');
      return n <= 0 ? 1 : n * factorialOf(n - 1);
    }


  6. WHEN TO USE MEMOIZATION

    Memoization can increase performance for some functions. But, if we use it for every component rendering, it might decrease performance since it stores results that increase memory used for the program. We should only use memoization when there is a clear benefit for doing so.


  7. OVERVIEW

    Memoization is an optimization feature in React which, when used in the right place, increases the performance of the program. React gives us PureComponent and memo to implement memoization. PureComponent is used with the class component and memo is used with the function component. Memoization increases performance by storing results for functions when the same prop is passed, hence reducing the number of re-renderings. But, overuse of memoization in places where there are not performance issues can result in reduction of performance.

     
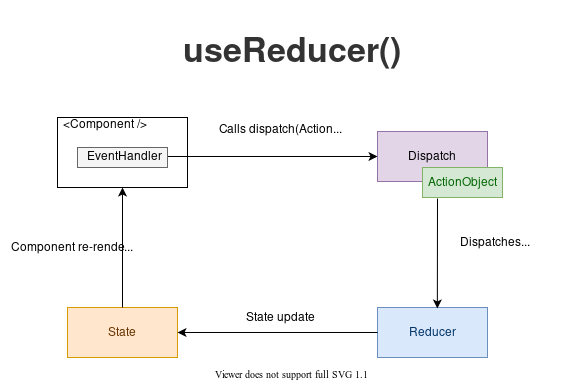
  1. The useReducer Hook is similar to the useState Hook.
  2. The useReducer() hook in React lets you separate the state management from the rendering logic of the component.
  3. It allows for custom state logic.
  4. If you find yourself keeping track of multiple pieces of state that rely on complex logic, useReducer may be useful.
  5. The useReducer Hook accepts two arguments. useReducer(<reducer>, <initialState>) 
  6. The reducer function contains your custom state logic and the initialState can be a simple value but generally will contain an object.
  7. The useReducer Hook returns the current state and a dispatch method.
  8. Initial state : The initial state is the value the state is initialized with.
  9. Action object : An action object is an object that describes how to update the state. Typically, the action object would have a property type — a string describing what kind of state update the reducer must do.
  10. Dispatch function :
    1. The dispatch is a special function that dispatches an action object.
    2. The dispatch function is created for your by the useReducer() hook:

      const [state, dispatch] = useReducer(reducer, initialState);


    3. Whenever you want to update the state (usually from an event handler or after completing a fetch request), you simply call the dispatch function with the appropriate action object: dispatch(actionObject).

  11. Reducer function :
    1. The reducer is a pure function that accepts 2 parameters: the current state and an action object. Depending on the action object, the reducer function must update the state in an immutable manner, and return the new state.
    2. React checks the difference between the new and the current state to determine whether the state has been updated, so do not mutate the current state directly.
    3. useReducer
      useReducer
  1. useRef() hook creates references.
  2. useRef(initialValue) is a built-in React hook that accepts one argument as the initial value and returns a reference (aka ref). A reference is an object having a special property current.
  3. There are 2 rules to remember about references:

    1. The value of the reference is persisted (stays the same) between component re-renderings;
    2. Updating a reference doesn’t trigger a component re-rendering.
  4. The 2 main differences between references and state:

    1. Updating a reference doesn’t trigger re-rendering, while updating the state makes the component re-render;
    2. The reference update is synchronous (the updated reference value is available right away), while the state update is asynchronous (the state variable is updated after re-rendering).
  5. From a higher point of view, references store infrastructure data of side-effects, while the state stores information that is directly rendered on the screen.
  1. What is React Router and routing?
    1. React Router is a powerful routing library built on top of React that helps you add new screens and flows to your application incredibly quickly, all while keeping the URL in sync with what’s being displayed on the page.
    2. Routing is a process in which a user is directed to different pages based on their action or request. ReactJS Router is mainly used for developing Single Page Web Applications. React Router is used to define multiple routes in the application.
    3. A router allows your application to navigate between different components, changing the browser URL, modifying the browser history, and keeping the UI state in sync.
  2. How React Router is different from history library?

    1. React Router is a wrapper around the history library which handles interaction with the browser’s window.history with its browser and hash histories. It also provides memory history which is useful for environments that don’t have global history, such as mobile app development (React Native) and unit testing with Node.
  3. React Router includes three main packages:

    • react-router: the core package for the router
    • react-router-dom: 
      • which contains the DOM bindings for React Router. In other words, the router components for websites.


      • React Router DOM enables you to implement dynamic routing in a web app. Unlike the traditional routing architecture in which the routing is handled in a configuration outside of a running app, React Router DOM facilitates component-based routing according to the needs of the app and platform.


      • React Router DOM is the most appropriate choice if you’re writing a React application that will run in the browser.

    • react-router-native: which contains the React Native bindings for React Router. In other words, the router components for an app development environment using React Native
  4. What is the difference between React Router and React Router DOM?

    React Router is the core package for the router. React Router DOM contains DOM bindings and gives you access to React Router by default.

    In other words, you don’t need to use React Router and React Router DOM together. If you find yourself using both, it’s OK to get rid of React Router since you already have it installed as a dependency within React Router DOM.

    Note, however, that React Router DOM is only available on the browser, so you can only use it for web applications.

    Can I use React Router DOM in React Native?

    The react-router-native package enables you to use React Router in React Native apps. The package contains the React Native bindings for React Router.

    Because React Router DOM is only for apps that run in a web browser, it is not an appropriate package to use in React Native apps. You would use react-router-native instead.

  5. Nested Routes are a powerful feature. While most people think React Router only routes a user from page to page, it also allows one to exchange specific fragments of the view based on the current route. For example, on a user page one gets presented multiple tabs (e.g. Profile, Account) to navigate through a user’s information. By clicking these tabs, the URL in the browser will change, but instead of replacing the whole page, only the content of the tab gets replaced.

 There is no “best” db to use with React JS because the type of framework/library you choose for your front end is never related to the type of db you choose. With that said, you’ve got a lot of options. A few that I’ve worked with are the following:

  • Firebase:
    • Easy/quick to set up,
    • NoSQL,
    • cool realtime database that makes it easier for you to test out your db calls.
    • Data is synced across all clients in realtime and remains available when your app goes offline.
    • The Firebase Realtime Database is a cloud-hosted database.
    • Data is stored as JSON and synchronized in real-time to every connected client.
    • When you build cross-platform apps with our iOS, Android, and JavaScript SDKs, all of your clients share one Realtime Database instance and automatically receive updates with the newest data.
  • MongoDB:
    • Object-oriented,
    • NoSQL db; pretty much similar to Firebase except that it doesn’t have any realtime features.
    •  MongoDB is a Document-Oriented Dynamic Schema Database that stores data in JSON-like documents.
    • It means you don’t have to worry about the Data Structure, the number of fields or the types of fields used to store values when storing your records.
    • Documents in MongoDB are similar to JSON objects.
    • Superfast in processing large data.
  • PostgreSQL:
    • Object-relational database that takes a little more time to set up, but the process is made easier with Sequelize.js; an ORM that lets us communicate with our PostgreSQL databases by mapping database entries to objects.
  • Realm :
    • It is a mobile database and a replacement for SQLite.
    • Although is an OO database it has some differences with other databases. Realm is not using SQLite as its engine. Instead, it has its own C++ core and aims to provide a mobile-first alternative to SQLite.
    • Faster than SQLite database (up to 10x speedup over raw SQLite for normal operations).
    • Convenient for creating and storing data on the fly.
    • The realm has lots of modern features, such as JSON support, a fluent API, data change notifications, and encryption support.
  • SQLite :
    • It is an open-source SQL database that stores data to a text file on a device.
    • It supports all the relational database features.
    • In order to access this database, we don’t need to establish any kind of connections for it like JDBC, ODBC. We only have to define the SQL statements for creating and updating the database.
    • Access to it involves accessing the file system. This can be slow. Therefore, it is recommended to perform database operations asynchronously.

It is crucial to choose the right database for your application. The right database here means one that complies with all the needs of your application in terms of data transactions, security, etc. Therefore, to facilitate your selection, let’s take notice of the following general database parameters:

  1. Space Management
    1. Perhaps, the most critical feature of a database is its capacity for effective memory management.
    2. If a DB doesn’t “take out litter” to free more space for your app, it can cause frequent crashes and spoil the user experience.
    3. That’s why you should look for a database that has some memory handling practices, like compaction, in its feature set. 
  2. Data Conflicts Resolution
    1. Database data conflict management is vital when you apply many cooperation features in your app.
    2. So before you pick one, make sure they use some advanced solutions to resolve such issues.
    3. As a rule, the proper databases are straight about that on their official website.
    4. When a DB isn’t, it’s a telltale sign of a simplistic approach to data conflict management.
  3. Security
    1. A good database should protect the stored data from any leak or hack.
    2. There is nothing to add – a database for your app must use all means to keep your users’ information safe, period.
  4. Off-Grid Synchronization
    1. If your app includes team engagement features, a database capable of offline synchronization will be a must.
    2. That’s because all the team members will need to have the same information (projects, resources) for a productive collaboration. 
    3. At the same time, individual targeted applications can do well without advanced synchronization.
    4. Syncing when the Internet connection is available will suffice.
  5. Data Types & Complexity
    1. Most applications use key-value pairs and JSON format to store data.
    2. Key-values and JSON are quite simple for a database to handle.
    3. However, to store full documents and objects, you will need a more sophisticated database.
    4. So you should find out about the storage capacity of a database in advance to be sure it serves all your needs.  
  6. Usability
    1. The less code and effort it takes to administer a database, the better.
    2. This factor has a great impact both on developers’ work and the database performance itself.
    3. Thus, avoid using complex databases when the low expenses and fast time to market are the priority for your app.

So therefore for our case we would need to implement Firebase, MongoDb or Postgres in case if relational DB.

With a microservice architecture, we’ll divide the application into multiple “projects”. In backend development, a microservice is usually an independent and deployable unit. But of course, this doesn’t work for a web or mobile application.

In backend development, it’s usually a single, independent, and deployable unit.

Microfrontend is a piece of the frontend, which a team can independently develop, test, and deploy as a unit. However, we need to ensure that we glue these pieces together to represent a single web application to the end-users.

So here are the important things you ultimately want:

1. Split app development into simple, decoupled component codebases
2. Make teams autonomous to build and deliver components — fast
3. Efficiently integrate and share components across many apps
4. Streamline collaboration, changes, and updates
5. Ensure design and development consistency

Strategies for assembling microfrontends

There are mainly two approaches. One approach is to use a single container app composing and hosting each microfrontend. The other approach is to host them separately (similar to pages in a website) where each knows the URL (integration points) with parameters to navigate to the other.


Why We Chose Micro-Frontend

A single, unified frontend works well until your app is catering to only a handful of customers. As you grow and start adding more capabilities, the inflexibility of a single, large frontend starts to throttle the pace of your delivery.

We have to brake down our product into several sub-domains, with each one being developed and owned by separate teams. When the different codebases from all these teams came together into a single application, there were natural consequences:

  • All the teams had to sync often on deployment and testing
  • Releases needed to be coordinated across the different teams and their schedules
  • Merge conflicts occurred frequently

It was not an efficient approach and certainly not scalable. Dividing the frontend into smaller apps is the need of the hour.

Synchronous code runs in sequence. This means that each operation must wait for the previous one to complete before executing.

Asynchronous code runs in parallel. This means that an operation can occur while another one is still being processed.

Asynchronous code execution is often preferable in situations where execution can be blocked indefinitely. Some examples of this are network requests, long-running calculations, file system operations etc. Using asynchronous code in the browser ensures the page remains responsive and the user experience is mostly unaffected.

With async function, you can use await to wait for that API call to finish before proceeding to the next line of code. Meaning, using async and await it can make your function behave like synchronous so you can avoid “callback hell” when using promises. 

One Response

Leave a Reply

Your email address will not be published. Required fields are marked *